Recreating Western Lacquer Using Historic Recipes – Day 10

Ten days of varnishes

Marianne Comment’s

These last two weeks have gone by in the blink of an eye. Jonas’s has been able to produce an incredible 17 different sample boards. I think it must be a record if anyone is measuring such things. I have done a mere three boards that represent techniques that are new to me.

In keeping with our study of these 17th and 18th century recipes we have been keeping industrial revolution work hours as well. Work begins promptly at 8 am and continues until 6pm with a leisurely 20 minutes for lunch. Then after we each head home, for a supper of pizza at the hostel for Jonas, and microwaved spaghetti for me, we each settle in for the evening’s work. By the light of our computer monitors we edit photographs and write up the blog. Bedtime for me this week has been routinely around midnight. It all seems to fit well with the spirit of the project.

Today we are posting the final day of working on the boards and early next week we will post our conclusions with photograph’s of the recent boards and ones I have made in the past.

Jonas’ Post Day 10

Application speckled picture using the raised black lacquered sample board

Today we experimented on how to lay gold speckles onto our varnish. Originally this sprinkling technique came from the Asian lacquer tradition. But there are of course other manners in the way of application. First I will explain on which manner we speckled our panel and will inform what the difficulties where in the process of application. Following I will compare our technique with western ways of application using historic literature.
The following components and instruments our needed:
Leaf gold
Seedlack varnish
Stencil brush
Sieve
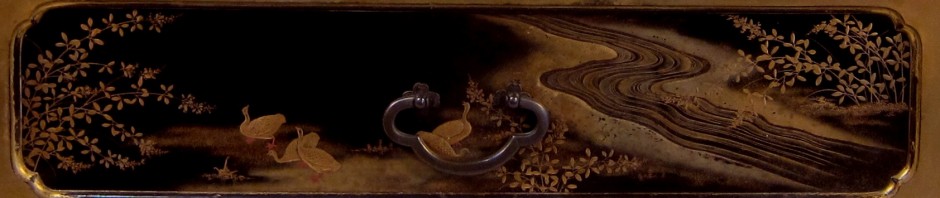
First we took the leaf gold and laid it in the sieve. Next we applied another layer of seedlac varnish on our sample board. (Usually the speckles are to be laid on the surface before making the raised areas). For the following procedure you have to be quick because it is the purpose to lay the speckles in the still wet varnish. Then the gold is rubbed through the sieve using the stencil brush. Like I said you have to be quick but you must also be aware that the gold speckles are spread evenly. When I reflect on my first application I was so busy to be quick that I totally forgot to spread the gold evenly. The result is like the two birds are flying in a snowstorm, also nice but was not what I had in mind!
When the varnish partially dry the gold speckles had to be pushed down into the varnish layer because of the reason the speckles had to be covered with varnish to make a flat surface. The next step is to put on layers of varnish until the speckles are covered with varnish to make a flat and glossy surface.
When we compare our technique to the Stalker and Parker book there are some differences. They say you first have to prepare your speckles (probably with a sieve or something similar). The speckles are to be added to the varnish and they advise that the quantity of speckles is not comparable to adding pigment in a lacquer dispersion, instead it is to be added in a much smaller degree. Then the speckles have to be stirred into the varnish. A couple of coats have to be applied on the panel until the speckles are evenly spread. To cover the speckles several coats of varnish are needed (Lacquer mixed with Venice turpentine). If you want to polish your work the following is required; “…having done everything as above directed, tis required that you give it eight or ten washings of your best Lac-varnish being al successively dried on, you are at liberty to polish it”.
Reflecting on the technique we have some questions; if the gold speckles could spread out evenly on surface. On the other hand, the speckles are already in the lacquer mixture covered with lacquer so this may affect the quantity of layers needed to cover them completely. The lacquer mixture with the Venice turpentine used for the following layers will make a thicker lacquer what apparently will result in less layers to cover the speckles completely. So on the Asian way one has more control on spreading the speckles evenly but there are probably more layers needed to cover the surface entirely. By the western way there are probably less layers needed to cover the surface entirely but we think it maybe difficult to spread the speckles evenly.

Making speckles with a sieve and laying them in the varnish

Birds in a storm - Speckles on the sample board

Posted in Uncategorized | Comments Off on Recreating Western Lacquer Using Historic Recipes – Day 10

Recreating Western Lacquer Using Historic Recipes – Day 9


Marianne Comment’s

Acrid smells and the hint of something burning instantly sent conservators into alarm mode. It did not take them long to track me down with my chemical oven full of copal varnish. This was the scene some 15 years ago at the ROM when I was interested in studying the oil/copal varnish recipes. I produced a number of panels and small papier maché boxes before my colleagues persuaded me to discontinue the project. Unlike the spirit varnishes we are preparing for this study,in which the ingredients are dissolved in ethanol, oil copal varnishes are made by mixing hot linseed oil with melted copal resin. The final varnish can be thinned with turpentine. Metal and paper maché products coated with this type of varnish were dried in an oven for several hours or days. This hard durable coating could be polished to a mirror like finish.

I have always wanted to spend more time researching this type of western lacquer but not had the time. Fortunately others have. A good article by Christopher Augerson that was recently brought to my attention was published in the Journal for AIC, Spring Summer 2011 issue (Vol. 50, Number 1). Not only is it an excellent description of the copals available, the chemistry, and production of the varnish, but he has also included an extensive bibliography of recent and historical articles. It will provide you with reading material about resins and western lacquer long after this blog ends.

R. Dossie imitation tortoishell made with oil/copal varnish

Application of raised lacquer using a black-varnished panel

To practise on decorative techniques in lacquer we used one of the black panels to do some exercises. Today we will make raised figurations on the flat surface of one of the black panels. The reason of this practise is to obtain a better view of the possibilities and restrictions of the material properties. First the designs were chosen from the Stalker and Parker book. The figures were drawn on a piece of paper that was later laid over yellow ’carbon” paper on the surface of the sample-board. The drawing was traced using the carbon paper, leaving the outlines of the figures behind on the panel. Next a small amount of shellac varnish was saturated with calcium carbonate (CaCO3), similar to the preparation of gesso. In fact, also gesso could be used for making such raised sections. Next we had to decide what sections of the figures should be raised; in this case these were two birds. Normally western raised sections contain only big volumes; details like the legs or nozzle’s were usually left unraised mainly because of the limitations of the material. For the two birds on the sample board I chose to raise the whole volume to experience the limitations of the material and to learn from it. The lacquer mixture was to be applied using a little stick. During this process the mixture should follow the outlines of the figure. If you apply too much in a thin area the mixture flows easily over the line, so you really should be aware of the quantity you apply. This flow capacity is also the main reason why refined details are really hard to accomplish. This is opposite to Asian lacquer, where really fine details can be made. So, after the big volume of the figures was filled in the legs and the nozzles had to be carried out, this did not work very well. There were first areas where too much was added which had a poor result. A smaller quantity had the disadvantage that a straight thin line couldn’t be applied on the surface. Eventually to make these details small drops were applied beside each other but it wan not a good result. After the raised sections were dry they were gilded using leaf gold with oil size.

Mixing seedlac and whiting for raised areas


Black panel with traced designs


Black panel with raised areas


Black panel with raised areas gilded

Reconstructing red lacquer (William Salmon)

Last week we prepared this precious red lacquer. After it had has been warmed for one week, finally the day has come test it out. After straining the result was a really thick blood red substance. To our opinion it was even too thick to be used for pigmented ground layers. Because of this reason the mixture was diluted using ethanol. After a good consistence was obtained, four coats were applied to the sample boards (this is what we decided because the recipe gives no direction in the process of application). After the first layers had been laid on we applied another six layers. In this case we diluted a portion of the original batch with ethanol in order to create a translucency between several layers of varnish. Reflecting on the properties of this lacquer we have to admit that the lacquer gives no homogeneously covered surface as opposed to the S&P red varnish. This results in an uneven surface, however, it is not a disturbing factor because it creates a really nice depth and translucency. By this reason it could be a compatible varnish to make tortoiseshell imitations.

William Salmon's red varnish - 4 coats

Reconstruction of green lacquer (Robert Dossie) continuation

Referring to yesterday, we have two panels one with the seedlac/pigment dispersion and the other one with the white varnish/pigment in it. Today both panels will first undergo a sanding procedure similiar to the other sanding procedures earlier mentioned. After this six layers of pure seedlac or for the other panel pure white varnish had to be applied. For the seedlac this was no problem whatsoever but the white varnish was after three layers too sticky to put more layers on. The cause for the long drying time is because it contains a large amount of turpentine in its mixture.

Reconstruction of yellow lacquer (William Salmon)

Also for this one, after a week finally the day has come to test out this precious varnish. For commencement we had some objections like; is this varnish capable of forming a film because of low amount of resin in its composition and will it make yellow colour because of its ingredients (dragonsblood, aloe and saffron). Well, it became a really thin varnish (like water). It flows and colours homogeniousely, leaving a yellow colour with a brown tint, yet as more layers are applied this brownish colour may predominate. It is capable of forming a film but there are several layers needed and by then the brown colour will predominate. It is not capable of forming a covering layer but acts rather as a dye leaving the layer beneath still visible. We did several experiments with this varnish: first on a red coloured surface (using the S&P red lacquer as mentioned before), we prepared a sample board prepared with a yellow coloured ground using a gum water/ Indian yellow dispersion(bottom panel in the photo below), we used a sample board with a white ground using a gum water/titanium white dispersion(middle panel in the photo) and a panel only with the gesso ground(top panel in the photo). In the case of the red ground panel it delivered no exceptional difference in colour but a slight gloss was created. On the white ground panel and the gesso ground panel it resulted in a discolouring causing a brownish colour. Only the yellow ground showed a positive result where it increased the yellow colour giving it more strength probably also because of its brown tint, at least as a yellow colour is wanted. What could the use of this lacquer be? Actually in my opinion it should be used as a layer in a lacquer system between other layers where it can act to heighten the colour of a varnish and to cause in someway more depth and translucency.

William Salmon's Yellow varnish

Reconstruction of white lacquer (Stalker and Parker) continuation

Today’s objective was to try another time if it is possible to obtain a plain glossy surface using the S&P white varnish. For this purpose another sanding procedure was carried out. Eventually the next application of the white varnish was even worse!
We’re really curious to see if the white varnish reacts the same way on the blue sample board.

Posted in Uncategorized | Comments Off on Recreating Western Lacquer Using Historic Recipes – Day 9

Recreating Western Lacquer Using Historic Recipes – Day 8


Marianne’s comments
As you can see from the photograph above, the boards are really looking spectacular.

Today I will catch up on one of the comments I have received. Miho Kitagawa writes that she feels the addition of Venetian turpentine to the seedlac in Stalker and Parker’s black Japan recipe creates thicker layers than seedlac alone. She says perhaps it is better to fill the small dents, holes, and wood grain. It may also give a glossier surface than ordinary seedlac.

At this point there is very little difference in appearance between Jonas’s black panels with and without V. turpentine. They were made according to instructions that the six layers containing V. turpentine are to be covered with six more layers of seedlac on top, which may account for their similar appearance. It will be interesting to see if there is any difference when they are polished. In the long term the Venetian turpentine layers probably act as a plasticizer and will affect the aging characteristics. We will have to revive the blog again in 20 years for the definitive answer.

Jonas’s Post Day 8

Reconstructing blue lacquer (Stalker and Parker) continuation

The next step in reconstructing this lacquer is to sand the surface smooth with p600 grid sandpaper. After sanding the surface of the panel we hope to have homogeneous blue colour, leaving no visible brushstrokes. Next three layers of Isinglass size were applied. I assume the purpose of these layers is to act as a buffer between pigmented bottom layers and the layers of white varnish .

Blue panel with multiple layers

Reconstructing green lacquer (Robert Dossie)

The recipe concerning this lacquer contains several possibilities to make this varnish.
First one could use the King’s yellow mixed with Prussian blue. On the other hand one can use King’s yellow or Dutch pink mixed with verdigris. We those chose to reconstruct this lacquer using the second option. In this case we will not be using the King’s yellow because of the toxicity of this pigment. This yellow is chemically As2S3 (Arsenic trisulfide) and is also known as orpiment or auripigment. This last name refers to its mineral state because it resembles a golden colour. Instead of the King’s yellow we will be using Dutch pink. In contradiction to its name pink was in these days known in English literature as a yellow colour. It is only during recent times that the word pink has been used to describe a rose pink or light red colour. Judging by many references from the seventeenth century to this pink they point out that this pigment was made by unripe buckthorn berries ( genus Ramnus) but there are some exceptions like: weld, Genestella tinctoria (a variety of broom) or from “calcined egg shells and white roses make a rare pink that never starves” For more information concerning this pigment I suggest consulting:

Harley. R.D. Artists’ Pigments c. 1600-1835 “a Study in English Documentary Sources”. Butterworth Scientific. London, 1982.

Furthermore R. Dossie leaves the choice to the practitioner to mix the pigments with the white varnish or with seedlac varnish. We chose to make two sample boards to see the difference between these two lacquers. The actual lacquer should be applied on a gilded surface to enhance the colour, like the recipe says: “…and they should be laid on a ground of leaf gold, which renders the colour extremely brilliant and pleasing.” The two pigments were ground in the lacquer using a mortar. We did this because the particle size of the verdigris was in our opinion too large to cover the surface homogeneously. First the verdigris pigment was added to the mixture and ground into the lacquer; afterward the Dutch pink was added until a nice green was obtained. When the composition of the lacquer was completed the mixture was applied to the surface of the panel in four separate layers, giving the surface a homogenous green colour.

Gilded panel ready for varnish


One layer of verdigris

Multple layer of verdigris

Reconstructing white lacquer (Stalker and Parker) continuation

First another sanding procedure was carried using the p600 grid sandpaper before the white lacquer varnish was applied. The first three layers gave actually a really fine result, but the following layers gave suddenly a really bad appearance. On the surface there was some kind of tension making edgy lines. These lines did occur several minutes after application and I believe this has nothing to do with possible brushstrokes because the lines were formed afterwards. For the next day another sanding procedure is planned by which we will sand all these irregularities out, hoping that the following layers will give a better appearance to the surface.

Best White Varnish forming pools after third layer

Posted in Uncategorized | Comments Off on Recreating Western Lacquer Using Historic Recipes – Day 8

Recreating Western Lacquer Using Historic Recipes – Day 7

Marianne’s comments

One beautiful thing about the Internet is that many rare books can now be easily accessed on-line or downloaded. Although I miss the fun of climbing stacks of the Thomas Fisher Rare Book Library, passing rows of beautifully leather bound volumes and drinking in the earthy smell, I do appreciate getting direct access to the information. It has made it easy to compare varnish recipes from one volume to another. In the rare book library I had to take notes in pencil, then months later travel to another city to take notes from another volume. Many times recipes seemed familiar but it was difficult to compare directly. When Jonas mentioned he wanted to make a varnish from William Salmon’s Polygraphice I looked it up again. I had not had the occasion to sit down and read the recipes for many years.

Instantly I realized they were exactly the same recipes as found in John Stalker and George Parker’s Treatise of Japanning and Varnishing.  The recipes are identical but the language Salmon used was simplified when compared to the long floral language used by the earlier authors’.  Although William Salmon’s book was first published before S&P,  the japanning recipes did not appear until the 8th edition well after Stalker and Parker’s publication.  (In a previous version of this blog I had stated that Stalker and Parker must have borrowed the recipes from William Salmon.  Fortunately one of my readers pointed out this error and Stalker and Parker are vindicated.)

This is the fourth time I have made Stalker and Parker’s Best White Varnish and every time I am lured in by the fun of mixing all the various resins. However, not once would I call it a successful varnish. The first coat goes on well, but the second and all other coats tend to form pools. The varnish drifts into hills and valleys and will not form one continuous coat. Jonas is about to start applying the varnish to the panels he has prepared with layers of lead white and wheat starch, which he describes below. I am looking forward to seeing how this batch will work out.

Jonas’s Post Day 7

Reconstructing black lacquer (Stalker and Parker) continuation

The next step in reconstructing this lacquer was sand the surface smooth using the p600 grid sandpaper. This procedure worked a lot better on the boards where only seedlac and pigment was used. The boards with Venice turpentine/seedlac and pigment caused the sandpaper to clog in a very short amount of time. After the sanding of the panels, twelve coats of seedlac mixed with pigment had to be applied using the same concentration as before.

Reconstructing red lacquer (Stalker and Parker) continuation

Today the red lacquered sample boards had also to be sanded smooth using the same grit sandpaper as for the black boards. After all of the sample boards were sanded smooth eight more layers of pure seedlac had to be applied. Actually this process went really well. The seedlac covered the surface very nicely leaving no visible brushstrokes. But after the application of the fourth layer, the dragon’s blood panel showed a slightly bubbled surface under bright light. Although it was only one panel we decided to leave the panels alone for now and finish the last four layers another day.

Reconstructing white lacquer (Stalker and Parker) continuation

Before I will describe the progress concerning the reconstruction of this lacquer, I wish to point out the difference in terminology between a transparent and a pigmented white lacquer. For the project we are consulting historic literature of the late seventeenth and eighteenth century. In the terminology of this period there is no such thing as a “transparent varnish” mentioned. There are surface coatings mentioned by the name of “white varnish” which usually mean a translucent varnish with a yellow cast. The white-pigmented varnishes are mostly also called white varnish or white Japan as well, which can be rather confusing. Certainly compared to modern times where a white varnish or lacquer usually means a white pigmented or opaque coating. One needs to look at the context of ‘white varnish’ to determine whether it is transparent or if it has pigment.

Yesterday we were applying the first three pigmented layers. Today the panels have to be sanded smooth. In this case we’re dealing with a highly toxic pigment so we made some precautions. Chemically lead white is basic lead carbonate (2PbCO3 – Pb(OH)2) so to inhale this dust would be dangerous, but also although to a smaller degree absorption through the skin is possible. First the panels were taped on backside and sides of the panel so no possible lead dust would be left on the panel after sanding. The sanding procedure was carried out using a plastic bag in which the panel was sanded leaving the toxic dust inside the bag. After the procedure was completed the tape was taken off and was left in the plastic bag. After this the bag was sealed leaving all the toxic dust inside the bag. This whole process like all the other sanding procedures was carried out outside the lab wearing a respirator and disposable gloves.

Sanding the lead white layer

The following step was to prepare the wheat starch mixing with water then heating until thick and translucent. After the starch was prepared and strained it was warmed like body heat. The starch had to be applied in three separate layers allowing it to dry thoroughly between each layer.

Preparing wheat starch

Preparing white lacquer (Robert Dossie)

This specific varnish is needed for several recipes of light coloured varnishes. We will use this varnish to reconstruct the yellow, the green, the blue and the white coloured varnish. For preparing this varnish the following components are needed:
Mastic
Turpentine

The weighted mastic was first ground to a fine powder before it was added to the liquid turpentine. The mixture was heated in a double boiler until the mastic is dissolved. After this the solution has to be strained. Probably because the mastic is a really soft resin and will on its own not cause a high gloss surface, R. Dossie suggests to add to this solution gum animi (Hymenaea courbaril) which has to be ground with turpentine. In this case he’s talking about turpentine in a solid form so we’ve been using rosin (colophony) for this purpose. In historical literature there is sometimes spoken (like in this case) about turpentine in a solid form, however this is commercially not available anymore. In the Doerner Institute they did some experiments to produce this solid resin. For more information I would like to refer to their publication: Walch. Katharina, Koller. Johann. Baroque and Rococo lacquers. Bayerisches Landesamt für Denkmalpflege, München 1997.
After the components were ground together they were added to the mastic varnish to dissolve them. The gum animi did not dissolve very well in this solution, leaving some resin at the bottom of the jar. Finally the varnish was strained before use.

Ground mastic resin

R. Dossie’s white varnish

Preparing Shellac varnish (Robert Dossie)

This varnish is needed to compose the blue, yellow, orange and purple coloured varnishes from R. Dossie. To prepare this varnish only two components are needed:
Shellac
Alcohol.

The shellac has to be weighed and afterwards it has to be added to the alcohol. This composition has to stand on a warm place for two days to dissolve, like the recipe says: “place the bottle in a gentle heat where it must continue two or three days”
Like all the other varnishes we made needs it also to be shaken once in a while to prevent the shellac from caking at the bottom.

Preparing seedlac varnish (Robert Dossie)

This varnish was needed to compose the green, blue and white coloured varnishes of R. Dossie. The following agents where needed to make this varnish:
Seedlac
Gum animi (Congo copal)
Alcohol

First all the lightest and clearest pieces of the seedlac have to be picked out analogous as with the seedlac of Stalker and Parker described earlier. After this the gum animi has to be weighted and grinded into fine powder. Because availability of the Hymenaea courbaril we used in this case Congo copal although we have big questions if it will dissolve in alcohol? The seedlac together with the gum animi will likely make an exceptionally hard varnish with a high gloss but due to its brittleness it may cause cracks in the varnish. R. Dossie offers the possibility to add to this mixture a little bit of turpentine to take off the brittleness and mix it with the animi. After the components have been dissolved the varnish has to be strained.

Posted in Uncategorized | Comments Off on Recreating Western Lacquer Using Historic Recipes – Day 7

Recreating Western Lacquer Using Historic Recipes – Day 6

Marianne’s Comments:

When I am at a party and people ask me what work I do, I usually start with; I am a conservator who restores objects. This is invariably followed by a question on exactly what objects I restore. When I say I specialize in lacquer many perk up and demand to know how to fix the scratch in their kitchen cabinets. This where I always get into trouble as I launch into the difference between Asian lacquer, western lacquer and their kitchen cabinets. By this time they start swirling the ice cubes in their near empty glass, mumble something about needing another drink and head to the bar.

The word lacquer can be confusing. It can be applied to many different materials with different properties and the meaning has continued to change over time. Today at the end of his post Jonas sorts out some of the historical references to these terms.

Jonas’s Post Day 6

Reconstructing blue lacquer (Stalker and Parker)

To reconstruct this blue lacquer the following components are needed:
Smalt
Lead white
Isinglass size
Gum water
White varnish (was prepared earlier, see day 1)

First the lead white has to be mixed with the gum water to make a thick white, paint like mixture. The smalt was mixed with the isinglass size that was warmed to increase the viscosity. After this the two mixtures were mixed with each other, adding the lead white gumwater to the smalt size to make a nice blue colour depending on personal taste. The recipe says “…all these well stirred and tempered together, being arrived at the consistence and thickness of common paint.” It is however not possible to obtain a thick paint like mixture mainly because the viscosity of the gum water, made according to S&P directions, is too low (like water) (fig. 46). In the process of applying the first layers of this mixture it has to be stirred very well because smalt pigment will sink directly to the bottom (fig.47). Although we used a very fine grind of smalt, after applying the mixture the pigment particles could be observed on the surface of the sample board (fig. 48). Chemically the composition of smalt (silicate glass) is variable; it contains approximately 66-72% SiO2 (silicon dioxide), 10-21% K2O (pottasium oxide), 0-8% As2O3 (arsenic trioxide), 2-18% CoO (cobalt oxide) and several impurities. The pigment was used during the 16th and seventeenth century. In the late eighteenth century the use of the pigment declined because of the availability of synthetic blue pigments like Prussian blue. Smalt has a low hiding power and also the colour intensity decreases, as the particles are ground finer. This is why we had to put on several layers to obtain a homogeneous surface. Because of the low index of refraction this resulted in a really mat surface. In total we had to put on 5 layers that had to dry thoroughly between each coat. If not properly dried the previous layer of isinglass would be dragged off.

fig 46 Smalt and lead white mixed


fig. 47 Smalt and lead white separating


fig 48 First coat of smalt and lead white


Lacquer Terminology

Last week we were talking about lacquers and varnishes. Today I will discuss the terminology of lacquers and varnishes and different uses. The word lacquer, in German lack, in French lacque and Italian lacca comes from the Sanskrit word lãksã or lakh which literally hundred thousand means. One can link this meaning back to swarms of insects (Laccifer lacca) that nest themselves on tree branches from which their secretions are the basis of shellac.(1) This resin is dissimilar to other natural resins as it is one of the few based on animals instead of plants. Shellac was first arriving in Europe at approximately the same time as Asian lacquer, therefore was often confused.

The word varnish, in German firnis, in Frech vernis and in Italian vernice refers to the name of the port town of Bernice (today the day known as the port of Benghazi, in Libya). At that time the resin sandarac (Tetraclinis articulata) was imported to Europe. Although the two different terms lacquer and varnish were used intertwined during the 17th and 18th century without any recognizable difference in meaning are there several German publications from the 19th century that draw a distinction between the two terms. “With the term varnish one means mainly a liquid which under influence of the environment has fast drying properties. For the reason applied in thin layers a glossy, transparent and hard durable layer will be created with which objects can be coated. So the purpose of a varnish is to protect a material against climatological influences from the outside and to give them a glossy surface.’(2)
Under this definition one can also include oil varnishes like linseed especially when enhanced with the addition of dryers.

Some people have attempted to define the two terms by using lacquer for coatings that dry by solvent evaporation and varnishes for those that dry by oxidation of the oil content. This however, does not fit well because Asian lacquer dries by polymerization followed by oxidation and paintings are commonly ‘varnished’ using synthetic and natural resins. Although there have been attempts to define these terms there is still no specific nomenclature to distinguish layers of resin dissolved in alcohol and coatings consisting of oil and resin. I do not think this will help Marianne at parties.

(1) Kopplin, Monica. European Lacquer. Hirmer Verlag. 2010. pag. 14.

(2) Tormin, Rudolf. Heinrich Kreuzburgs Lehrbuch der Lackierkunst wie der Firnis- und Lackfirnisfabrikation. Neuer Schauplatz der Künste und Handwerke 14, 10th edition, Weimar, 1884. pag. 1

Posted in Uncategorized | Comments Off on Recreating Western Lacquer Using Historic Recipes – Day 6

Recreating Western Lacquer Using Historic Recipes – Day 5

Marianne’s Comments.

Yesterday Jonas added dragon’s blood to two of the varnishes we are preparing. Dragon’s blood conjures up images of alchemists in medieval castles preparing various magical potions. In fact, the name in one form or another has been used since ancient times to refer to a blood red resin. In Roman times it likely came from drops formed by the natural exudation of Dracaena cinnabari found on the isle of Socotra. By the 15th century the resin was being collected from the stems of Dracaena draco in the Canary Islands. It is not clear when they started to use the resin harvested from the exterior sheath on the fruit of Daemonorops draco, a rattan palm growing in Borneo, Sumatra and Malaysia. According to Kremer pigment, where my resin was purchased, this is the source to the dragon’s blood we are using. I do not think it will make much difference to the behaviour of the varnish since either of these sources may have been used historically. For further information on this resin and many others I highly recommend Jean Langenheim’s book on Plants resins. It s essential reading for anyone studying artist materials derived from plants.

Plant Resins -Chemistry, Evolution, Ecology and Ethnobotany by Jean Langenheim, 2003, Timberpress, Portland Oregon

Reconstructing black lacquer (Stalker and Parker) continuation

The boards now have six layers, so they were sanded smooth. In this part of the process another six layers had to be applied. As we explained, there are two different groups of panels, the one with the Venice turpentine mixed with the seedlac, the other one with the pure seedlac. It is interesting why they would choose to use these softer layers between the seedlac layers. Because it is softer it has more elastic properties. For example because of this elasticity it should be more capable of responding to shrinkage and swelling of the wooden substrate. Another reason could be that it is used to reduce the tension between several layers using the Venetian turpentine. Judging by this hypothesis the Venetian turpentine layers are used between layers of thick saturated black lacquer and a lacquer that contains about half of the amount of pigment used as in the first layers. In this case the Venetian turpentine layers could act as a buffer between these different kinds of lacquer. Still if this was the reason they used these softer layers why did they use six of them.

Well, returning to the physical lacquering of our panels the two groups show several differences both in the way of application and visible appearance. The pure seedlac flows a lot better and covers the piece quit well, leaving no visible brushstrokes. The seedlac containing Venetian turpentine is the other way around it flows less well than the pure seedlac, leaving a rather mat surface and visible brushstrokes. For the future it will be interesting to see if there is any difference in the way they degrade.

Red and Black Sample Boards Drying

Reconstruction of red lacquer (Stalker and Parker) continuation

Yesterday all three of the sample boards were sanded smooth. Having this done the application of the following layers could be started. For the common usual red panel and the light pale red panel this procedure is the same. These panels were covered with eight layers of pure seedlac, after this the panels had to dry for at least 12 hours. Concerning the deep dark red panel, pure seedlac was be prepared before mixing with dragon’s blood. Bit by bit it had to be added to the seedlac till a nice blood red colour was reached. This mixture of the well dissolved dragon’s blood and seedlac was applied to the panel until it till it was well covered with it. In total we used 5 layers of this red lacquer. In comparison the recipe tells the following: “When you have laid the common red as before directed take Dragonsblood reduce it to very small dust or powder and as your judgement and fancy are inclined, mix it a little at a time with your varnish; and indeed you will find, that a very small portion will extremely heighten colour, as also that every wash will render it deeper, but when you find it has acquired a colour almost as deep as you design, forbear you must remember you have more varnish of seedlac to lay on which will add and supply what is wanting. Consider therefore how many washes are still to be laid, and according to that use your Sanguis Draconis or Dragonsblood.” Considering this explanation we made the dragonsblood mixture some bit lighter as what we had actually in mind considering the following seedlac layers.

Preparing Yellow lacquer (William Salmon) continuation

Four days ago we soaked the precious genuine saffron in the alcohol. Today the time has come to strain the saffron and to add the other components to it to make the actual varnish. We have some questions about this varnish; first when we look at the title it should be a yellow coloured varnish what we are preparing, but judging by the components used it would be a much darker and rather red colour. The colour of the saffron has an orange red colour with a yellow tint, the dragon’s blood is red, and the aloe has a brownish colour with also a yellow tint. On the other hand is the amount of resin in the mixture is minimal. Dragon’s blood is a red coloured resin, the Saffron is a dye and the aloe is a thickened juice of the leaves of different types of the Lilacaceae group and could act as a resin. Still the amount of resin is very low and we are really curious if it is capable on forming a film on our sample board. Also William Salmon gives no instructions how the layers should be built up, he only explains how to make this varnish. We expect this varnish to be applied as an upper layer, on the other hand it should not be a high gloss lacquer because it contains no hard resin. For now the varnish will be heated for a week. Next we will be doing several experiments with this varnish on different grounds to find out how this varnish should or could be used.

Dragon's blood to be added to W. Salmon Yellow Varnish


Aloe to be added to W. Salmon's Yellow Varnish

William Salmon's yellow varnish

Preparing red varnish (William salmon) continuation

In the same context as the yellow varnish described above William Salmon gives also for this varnish no explanation on which ground it should be used. Although the varnish itself has to be heated till next week we are already preparing some experiments to do with it find out. One of these experiments is to test it on a common usual red ground (Stalker and Parker) so we have been preparing a sample board with the seedlac/vermilion mixture as described before. We used only the pigmented layers for this experiment.

Posted in Uncategorized | Comments Off on Recreating Western Lacquer Using Historic Recipes – Day 5

Recreating Western Lacquer Using Historic Recipes – Day 4

Marianne’s comments

Not too much to post today as we were pretty busy making varnishes.
I received a note about my way of putting horsetail in a bundle to use it like a glass bristle brush. It was felt that it would scratch the surface used this way. I have to agree that it indeed does scratch the surface, so obviously could not be used for fine finishing.

Albrecht Czernin answered my request for information by suggesting. ‘‘One way to use it, is take an internodium and fill it with water, let it soak a short while to get it flexible again. Then you can flatten it, let it dry and use it. It does not lose its sharpness easily and lasts a long time. Under magnification you will see why it works. Its surface is like a fine file.”

I am lucky that I have lots horsetail year round to so can prepare it fresh avoiding the need to soak it. My usual method of using it is to cut off the nodes, slit the tube so it can be opened up. The pieces are clamped between two boards and left for several days to dry. Then I choose the smoothest pieces and glue them to a small block of wood. This makes a great reusable sanding block. The debris from sanding varnish does not clog so a block last indefinitely.

Albrecht also suggested “As a bundle it is used along the length side of the bundle and just held together by the hand. With this method, the stems have to be kept round. The nodes can scratch a little bit, but usually they are of a smaller circumference. “ For fine work again only internodes have to be used.”
I have never used it this way but look forward to trying it. Thanks for the advice.

Here are a couple of photographs of the way horsetail was used in Japan. The black and white photo is the only one I happen to have of my sanding block method. Hopefully by the end of this blog we will have a new block to photograph.

Horsetail mat in Japan - used for abrading wood

Horsetail braided to form pad - Japan

Horsetail dried and glued to a block

Jonas’s Post Day 4

Reconstructing black lacquer (Stalker and Parker) continuation

Today after laying the first six layers of black varnish the sanding procedure had to be carried out. Each sample board was sanded with a p600 grit sandpaper. All irregularities had to be sanded out as well as possible brushstrokes.

Reconstructing red lacquer (Stalker and Parker) continuation

After the first four layers of red varnish had been laid on, the sample board has to be sanded off smooth, like the recipe says “…and if your reds are full, and in good body to your liking, rush it very smooth” Due to the toxic pigment used HgS (mercury sulphide) we applied two additional layers of transparent seedlac so no mercury dust is created during sanding. For the following day the sanding procedure will be the same for both the black and red panels.

Reconstructing white lacquer (Stalker and Parker) continuation

For the white coloured lacquer first the isinglass size had to be prepared as described before. After it had been strained and warmed up again the lead white pigment had to be mixed with it. In the beginning the mixing of the lead white with the Isinglass size did work very well. The viscosity of the Isinglass was too high by which a good dispersion between the two components was not possible. For this reason the lead white pigment caked to each other making clumps in the varnish. It was obvious that the viscosity of the Isinglass had to be lowered to allow dispersion to conform to our wishes. Perhaps we had not heated the isinglass long enough when we made it. (we warmed it approximately 30 minutes). We made a new batch, heating the size for two hours during preparation. The result worked out positively, the viscosity of the Isinglass was lowered and the lead white pigment could be mixed easily with it. Three layers of this mixture were applied.

Posted in Uncategorized | Comments Off on Recreating Western Lacquer Using Historic Recipes – Day 4

Recreating Western Lacquer Using Historic Recipes – Day 3

Marianne’s Comments:
Today we started preparing horsetail so it can be used for sanding the panels, as they are prepared. On the Sunshine Coast in British Columbia where I live gardeners despise it. It is an ancient plant that spreads by rhizomes deep under the soil. If you pull it out it simply sends up new shoots. They shake their heads when I talk about how delighted I was to find it growing all over my property.

Horsetail is used all over the world as an abrasive. In Japan I have seen examples of how the stalks are braided to make a scouring pad or it can be strung together to make a sanding mat. Jonas will outline below references to its use in Europe. Although it is mentioned in early literature I have yet to find a description of exactly how it was used. Perhaps it was so common that no one thought to write it down. In the absence of information I have devised several methods for its use. If anyone has seen a written description in historic literature I would like to learn of it. I hope you enjoy Day 3.

Jonas’s Post Day 3:
Harvesting the Horsetail (Equisitum giganteum)

fig 38 Harvesting Horsetail


Today we went down the hill to harvest some Horsetail to experiment with its use as an abrasive.
Historically this plant was used as an abrasive because the Equisitum contains very high levels of silicates (15% by weight). It is a bamboo like plant with whorls of knuckled needle like leaves. In historic literature it is known as rushes like in (Stalker and Parker) “rush it smooth”, They are also called Dutch rushes. They say “you can furnish yourself with it from iron forgers”. There is however no exact explanation how these rushes should be used. The horsetail stem could be cut off in small pieces and afterwards pressed between two wooden boards to flatten and dry them. Or the leaves of the plant could be used in a bundle held by string. (fig 39,40,41).

fig 39 flattened horsetail stalk

fig 40 branched horsetail bound into bundle

fig 41 cross section of bound horsetail bundle


Botanical classification:

Kingdom: Plantae
Division: Pteridophyta
Class: Equisetopsida
Order: Equisetales
Family: Equisetceae

Etymologicaly the name Equisitum derives from the Latin equus (horse) and seta (bristle). Other names are: snakegrass and puzzlegrass.

Preparing a red varnish (William Salmon) continuation

Yesterday we prepared this red varnish, and for today we have been setting up a way to heat the varnish. We used a coffee mug warmer on which we put a cookie tin filled with sand. The jar with varnish was put inside the tin filled with sand so that the varnish was beneath the level of the sand. The varnish will be heated this way for a week (fig 42).

fig42 red varnish in warm sand

Reconstructing black lacquer (Stalker and Parker) continuation

After laying the first three layers of thick black seedlac varnish, today we applied three more layers of the same lacquer. For these layers we used less pigment in the seedlac varnish. The next step in the process is to mix some Venice turpentine into the thick seedlac and strain it afterwards. Like the recipe says “Then with a quarter of a pint of the thickest seedlac mix of Venice turpentine the bigness of a walnut and shake them together until it is dissolved” (fig 43).

Fig. 43 Seedlac with Venetian Turpentine added


In this composition the vine-black has to be mixed just to colour the varnish, so the concentration of pigment will be much lower than before. As we are building up layers it is usual to put less and less pigment in the lacquer dispersion. By doing so the index of refraction or gloss will increase but it will also create a translucency between the layers of the lacquer.
We wondered why Venice turpentine would be added to the seedlac for next layers. How does it change the properties of the final varnish? This is why we used another sample board that had the same layer build-up as the former sample board. We will apply on one of these boards the following layers using the seedlac mixed with the vine black and the other one using the seedlac/Venice turpentine mixed with the vine black. Afterwards we will compare these sample boards with each other to see the difference. The Venice turpentine will probably cause a softer varnish and gloss may by this fact decrease. On the other hand will the harder seedlac may form cracks over time due to its brittleness.

Reconstructing red lacquer (Stalker and Parker)

For recreating this lacquer we had to prepare three sample boards because the recipe contains descriptions of three different varnishes; the common usual red, the deep dark red and lastly the pale red. For all three reds the same binding media is needed (thick seedlac). Having prepared the seedlac, the vermilion or cinnabar pigment is with it. The seedlac varnish is needed for the common usual red as well as for the deep dark red. Again the lacquer needed a concentration of pigment, which covers the piece well but not as concentrated as with the black lacquer, like the recipe says “your mixture should have a thickness between thick and thin”. The two sample boards had to be covered with it four times (fig 44,45). For the pale red varnish the vermilion had to be mixed together with lead white in the seedlac. By adding the lead white we made the lacquer a little but lighter in colour than the former two sample boards. We chose in this case a lighter red than we actually wanted because the seedlac layers over top will darken the colour. The piece had also to be covered with it four times (fig.46)

fig. 44 prepared panel


fig. 45 Common Red Panel


fig. 46 Pale Red Panel

Posted in Uncategorized | Comments Off on Recreating Western Lacquer Using Historic Recipes – Day 3

Recreating Western Lacquer Using Historic Recipes – Day 2

Marianne’s Comments:
In response to yesterday’s blog Miho Kitagawa says that the Manila Copal we used in the S&P Best White varnish was not available in Europe at the time S&P were writing. She felt that Zanzibar copal, which is no longer available, might have been used.

In response to my question about the best substitute she wrote:
About the copal, this is the biggest problem to get good substitute, because even we don’t know what the original must be. The Zanzibar copal mentioned in Livache & McIntosh book, was taken out from Trachilobium Hornemannianum. I have looked at the internet and it’s in a same Hymenaea family. So it could not be very far from Manilla copal and there aren’t good alternative at the moment. I tried Mexican copal and other transparent resins from South America or Egypt and so on, but they don’t dissolve in ethanol very well. Madagascar copal dissolves in Ethanol if it is left about 3 days in a warm room. The effect of fossilized resin and raw resin from live trees could make different quality varnish, especially the hardness.I always felt the surfaces of Best White Varnish of S&P (made with Manila or Kauri) are too soft to get good gloss even after a few weeks.

The biggest problem of Best White Varnishes, which I made with Manilla or Kauri, was, obvious clacks appeared within a few months and turned yellow very soon, even not exposed under sunlight. This might not be the reason of copal but other resins too. Seeing white varnished furniture such as a white clock in Museum fire Lackkunst in Munster, or Chippendale cabinets in the V&A, they don’t show such dirty yellow or cracks. Both are 18th Century British furniture and they must have been painted with different White Varnish. I think mixing too many different resins doesn’t work much or even giving bad effects.”

I agree with Miho that the S&P BWV is an inferior white varnish. It does not apply easily, is very soft and lightly cracks within a few months of application. However, I have to add that the boards I made in 1991 are in very good condition. The cracking did not continue beyond the initial stage and they now have a very hard glossy finish. It will be interesting to see how this batch turns out when Jonas gets to the application stage. I will add photographs of my old panels for comparison to the new ones.

Jonas Post Day 2:

Preparing the Seedlac varnish (continuation)

After picking the highest quality Seedlac pieces they were dissolved in alcohol. After one night dissolving the varnish separates into two parts, the upper part being the clearest. This part should mainly be used for the upper more transparent layers..
The bottom part of the dissolved seedlac has a brownish colour with lots of impurities and wax.

fig13

(fig 13). The next step in the process is to pour off the upper part of the varnish and strain it by a filter or a cloth into a separate jar (fig 14)
The bottom part of the varnish has also to be strained in a separate jar (fig 15).

Shellac
For the shellac varnish the following agents are to be needed:
Alcohol (spirit)
Shellac

After measuring and weighing the components the Shellac is dissolved in the alcohol and afterwards it has to be strained on the same manner as mentioned above.

Preparing the white varnish (continuation)

Yesterday the needed resins where put in alcohol to dissolve them in 4 separate bottles. The following pictures will show how these dissolve after one night. Many of them dissolve actually pretty well but there are some exceptions. The sandarac and mastic mixture did not dissolve completely after one day and 10 % remains on the bottom of the jar as a sticky substance. Also the Benzoin does not dissolve as well as the other compounds like the Sandarac, Copal, Gum animé, Rosin, Venetian turpentine and Gum elemi. Most of the Benzoin remains on the bottom of the jar like a spongy substance (fig. 17, 18, 19, 20).

fig 19

fig 20

The four separate jars with their dissolved resins were strained with a filter and a cloth that had to be squeezed out

Preparing Isinglass size (Stalker and Parker)

In several recipes in the Stalker and Parker book an Isinglass size is needed. Isinglass is an adhesive, which comes from the swim bladders of the sturgeon fish. The swim bladders are to be dried (fig 24). The collagen can be extracted by soaking small pieces in water and warm it to approximately 60ºC, afterwards it has to be strained before use. For our research the Isinglass size is needed to reconstruct the white and blue coloured varnish (Stalker and Parker). In the white coloured varnish the Isinglass size is to be used to mix with lead white pigment. In the blue coloured lacquer it is used to mix the smalt pigment. The reason they used Isinglass size is so that these light coloured varnishes would not be affected by the colour of the binding media. For this purpose also Gum water was also used.

For making the Isinglass size only two components where needed:
Isinglass
Water
The Isinglass was soaked in the water and afterwards it had to be strained like mentioned above (fig. 25).

Preparing Gum water (Stalker and Parker)

To make the Gum water only two components are to be needed:
Gum Arabic
Water

The gum water is used like the Isinglass size to mix light coloured pigments. Within our research it is used in the recipe to make a blue coloured varnish to mix the lead white in.
The Gum Arabic was first measured, weighed and afterwards pounded into fine powder. It was mixed into the water to dilute it (fig. 26, 27). Afterwards the gum water has to be strained on the manner explained earlier.

Preparing Yellow lacquer (continuation)

Today no further operations have been done on this recipe. The Saffron has to be soaked in the alcohol for 4 days. How the extraction process has progressed after one day can be seen in the following picture (fig. 28).

Reconstructing black lacquer (Stalker and Parker)

Having prepared the seedlac, the black lacquer is made by mixing vine black pigment into the seedlac. Like the recipe says “pour of some of the thickest seedlac varnish and put it in a galipot adding to it as much as Lamblack as will at the first wash blacken and discolour the work” In this case we used the thick seedlac from the bottom of the separated layers and mixed it with much vine black pigment (fig 29, 30).

What arises is a thick black varnish, which rather looks like a paint leaving a mat surface due to the high concentration of black pigment. The main purpose of these first layers is to cover the surface in one strike with a black varnish. The sample board was varnished with this thick black lacquer three times permitting it to dry thoroughly between the layers in agreement with the original recipe. The following pictures show the sample board before and after application of the lacquer (fig. 31,32, 33)


Preparing a red varnish (William Salmon)

Today the preparations for this varnish where made because afterwards it has to be heated for a week. The recipe includes the following components:
Alcohol
Shellac
Dragonsblood
Cochenille (carmine red)

The Cochenille can be a confusing factor within this recipe because this is a dye.
On the other hand dyes where used to intensify the red colour. Cochenille was used in the same way that wood extracts like Brazilwood, fernwood were used. Cochenille or Carmine dyestuff was mostly used for precious decoration(1). The confusion is that the two names were frequently used as a synonym for each other whereas the two differ from each other. The Cochenille is dyestuff extracted from the Cochenillelous Dactilopius coccus. Carmine is a lake, chalk coloured by Cochenille dye and is a pigment. In this context it could either be the lake pigment or a dye. There is another reason why they would use the dye instead of the lake pigment. The main component for red lacquers Cinnabar or Vermilion will darken when exposed to light. Cochenille dye was used historically in transparent lacquer to act as a protective layer although now we know that it is not very light fast. Within this recipe there is no Cinnabar used so there is no direct need why they should have used the Cochenille dye. We chose for this red lacquer the Carmine lake pigment because it was readily available.
Walch, Katharina. Baroque and Rococo red lacquers “The red lacquer-work in the Miniaturenkabinett of the Munich Residenz. Replicating the technique on the basis of historic sources and scientific investigation”. in Baroque and Rococo lacquers. Bayerisches Landesamt für Denkmalpflege, München 1997.pag. 131.

Because of the expensive materials used in this recipe we used 5% of the original amounts. All the components measured and weighed (fig. 34, 35, 36), then they were mixed together with the shellac in the alcohol (fig 37). After heating the varnish for a week it should have blood red colour.

fig 34 Shellac


fig 35 Dragon's Blood


fig 36 Carmine Red


Red Varnish

Posted in Uncategorized | Comments Off on Recreating Western Lacquer Using Historic Recipes – Day 2

Recreating Western Lacquer using Historic Recipes – Day 1

Marianne Webb – Introduction

For the next two weeks my website will feature a blog on recreating western lacquer surfaces using historic recipes. This project came about because Jonas Veenhoven is doing an internship with me to study western lacquer. For students to get a better understanding of the complexity of the finishes I usually have them make sample boards using 17th and 18th century recipes. Since Jonas is doing a short intensive internship we thought that we would take the opportunity to share this experience with others interested in the subject. Jonas will do most of the writing and photography and I will occasionally add my comments on my previous adventures in creating western lacquer.

Jonas Veenhoven – Introduction:

The following two weeks we will post on this website our findings and results about a short research about historical western lacquer recipes. The recipes used are to be extracted out of three specific 17th and 18th century sources:

Salmon, William. Polygraphise, or the arts of drawing, engraving, varnishing, Japanning and gilding. London, 1672, 1685, 1701, 1735, 1778, 1781.

Parker, George and Stalker, John. A Treatise on Japanning and Varnishing. London, 1688; reprinted in1960.

Dossie, Robert. The Handmaid to the Arts. London, 1758, 1764.

The reason for this research is mainly to understand what the problems were in creating these western lacquers, which had to compete with the Asian lacquered objects. The total procedure will be documented on this blog and hand written on the back of each sample board for future reference. All of the original recipes call for large quantities for example dissolve 1.5 pounds of seedlac in a gallon of spirits(ethanol). We will be using for all of the recipes a 20% solution with some exceptions because of the size of our sample boards and precious materials.

For this research we will be using sample boards made of poplar plywood. The sizes of the sample boards are identical to each other (6cm x 18cm). First the sample boards were sanded starting with sandpaper 180 and later with 240 sandpaper, moistened and sanded again to remove the raised grain (p400 sandpaper). The following step was to apply three isolation layers with a 6% rabbit hide-glue. After this the gesso was prepared using 6% rabbit hide-glue, with calcium carbonate (CaCO3).
First one coat of gesso was applied, dried, and then sanded of after drying with p400 sandpaper. Two more coats where applied and sanded again after drying with p400 sandpaper. The sample boards had to be divided into two groups. The first group to be used for light coloured lacquers like blue, white or yellow. An opaque preparation was needed with the grain completely filled. The second group used for the dark coloured lacquers need less layers of gesso. The grain had to be completely filled but the figuration of the wooden substrate still visible. In total three layers of gesso where applied. The dark coloured sample boards needed six layers of gesso. The final sanding procedure was done with p800 sandpaper on both groups of sample boards.

Preparing the white lacquer (Stalker and Parker)

For recreating this lacquer one has to be furnished with eight different resins which al have to be dissolved in alcohol.

These are the following ingredients:
Sandarac
Mastic
Venetian turpentine
Copal
Gum Elemi
Benzoë
gum animé
Rosin

The gum animé can historically seen be a confusing. The name was known to denote several different resins. To know which specific resin is used in an historical recipe it is important to know the exact context of the recipe. Mostly a Copal resin is needed but there are several other resins, which are known under this name.
When we look to the exact context of this recipe we know that all of the agents are dissolved in alcohol. In this context it could be a soft copal resin. There are several other names known under gum animé like West Indian animei or Tacamahac resin, which comes from the Calphyllum (Guttiferae). Another form is known under demerara animé, this is a South American Copal coming from the Hymenaea courberil.
For the Stalker and Parker white varnish like mentioned above we used the Hymenaea courberil from Brazil because it is used in an alcohol varnish and the recipe just needs a soft copal resin. On the other hand lacquer artists did not know exactly what they where using since they never saw this tropical plants where these resins came from. Also different names changed over time.

First all the resins where weighted and measured (fig. 1). After this the Hymenaea courberil, Copal (we used Manilla Copal in this recipe), Rosin and Benzoin where pounded into fine powder before they where dissolved into their bottles of alcohol (fig 2,3,4,5). The other resins needed no further preparation and could directly be added in their bottles filled with alcohol. In total there where four different bottles used filled with alcohol and resin. The first bottle was filled with the Copal, Rosin and alcohol to dissolve them (fig 6). The second bottle was filled with the Hymenaea courberil, Benzoin, Venice turpentine and the alcohol to dissolve them (fig 7). The third bottle was filled with the Sandarac, Mastic and alcohol to dissolve them (fig 8). The fourth and last bottle was filled with the gum elemi by itself and alcohol to dissolve it (fig 9). All the bottles had to be shaken approximately once in the two hours, like recipe says “make them dance and change places”.

fig. 1. Weighted resins needed for the white varnish (Stalker and Parker)


fig. 2,3 pounding the Benzoin into fine powder.


fig. 4. Pounded Rosin.


fig. 5. Pounded Copal.


fig 6. Copal and Rosin in alcohol


fig 7. Gum animé, Benzoin, Venetian turpentine in alcohol.


fig. 8. Mastic and Sandarac in alcohol


fig. 9. Gum Elemi in alcohol

Preparing Yellow lacquer (William Salmon)

This recipe needs the following agents:
Alcohol (spirit)
Saffron
Aloë
Dragonsblood

For this recipe today only the Saffron coming from the Crocus sativus was prepared because this dye has to be soaked in alcohol for 4 days. We used for this recipe 10% of the amount needed in the original document. First the Saffron was weighed and measured and put in the alcohol (fig 10). This strong and precious EUR 773,50/ CA$ 1044,011 (100gr) dye directly shows a yellowish colour in the alcohol solvent (fig 11).


fig. 10. The weighed Saffron


fig. 11. Extracting the yellowish colour from
the Saffron.

Preparing Seedlac varnish (Stalker and Parker)

For this recipe the following the following agents are needed:
Alcohol (Spirit)
Seedlac

The first thing we did was to pick out the lightest Seedlac pieces and leaving the dark coloured parts behind to obtain the highest quality varnish. This is a very time consuming work but is needed to obtain the best seedlac varnish (fig 12).


fig 12. Picking the highest quality seedlac

Posted in Uncategorized | Comments Off on Recreating Western Lacquer using Historic Recipes – Day 1