
Marianne’s comments
One beautiful thing about the Internet is that many rare books can now be easily accessed on-line or downloaded. Although I miss the fun of climbing stacks of the Thomas Fisher Rare Book Library, passing rows of beautifully leather bound volumes and drinking in the earthy smell, I do appreciate getting direct access to the information. It has made it easy to compare varnish recipes from one volume to another. In the rare book library I had to take notes in pencil, then months later travel to another city to take notes from another volume. Many times recipes seemed familiar but it was difficult to compare directly. When Jonas mentioned he wanted to make a varnish from William Salmon’s Polygraphice I looked it up again. I had not had the occasion to sit down and read the recipes for many years.
Instantly I realized they were exactly the same recipes as found in John Stalker and George Parker’s Treatise of Japanning and Varnishing. The recipes are identical but the language Salmon used was simplified when compared to the long floral language used by the earlier authors’. Although William Salmon’s book was first published before S&P, the japanning recipes did not appear until the 8th edition well after Stalker and Parker’s publication. (In a previous version of this blog I had stated that Stalker and Parker must have borrowed the recipes from William Salmon. Fortunately one of my readers pointed out this error and Stalker and Parker are vindicated.)
This is the fourth time I have made Stalker and Parker’s Best White Varnish and every time I am lured in by the fun of mixing all the various resins. However, not once would I call it a successful varnish. The first coat goes on well, but the second and all other coats tend to form pools. The varnish drifts into hills and valleys and will not form one continuous coat. Jonas is about to start applying the varnish to the panels he has prepared with layers of lead white and wheat starch, which he describes below. I am looking forward to seeing how this batch will work out.
Jonas’s Post Day 7
Reconstructing black lacquer (Stalker and Parker) continuation
The next step in reconstructing this lacquer was sand the surface smooth using the p600 grid sandpaper. This procedure worked a lot better on the boards where only seedlac and pigment was used. The boards with Venice turpentine/seedlac and pigment caused the sandpaper to clog in a very short amount of time. After the sanding of the panels, twelve coats of seedlac mixed with pigment had to be applied using the same concentration as before.
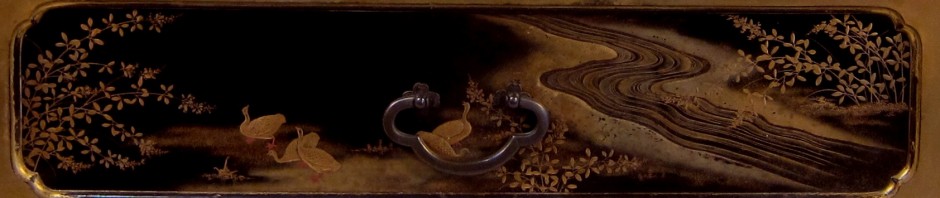
Reconstructing red lacquer (Stalker and Parker) continuation
Today the red lacquered sample boards had also to be sanded smooth using the same grit sandpaper as for the black boards. After all of the sample boards were sanded smooth eight more layers of pure seedlac had to be applied. Actually this process went really well. The seedlac covered the surface very nicely leaving no visible brushstrokes. But after the application of the fourth layer, the dragon’s blood panel showed a slightly bubbled surface under bright light. Although it was only one panel we decided to leave the panels alone for now and finish the last four layers another day.
Reconstructing white lacquer (Stalker and Parker) continuation
Before I will describe the progress concerning the reconstruction of this lacquer, I wish to point out the difference in terminology between a transparent and a pigmented white lacquer. For the project we are consulting historic literature of the late seventeenth and eighteenth century. In the terminology of this period there is no such thing as a “transparent varnish” mentioned. There are surface coatings mentioned by the name of “white varnish” which usually mean a translucent varnish with a yellow cast. The white-pigmented varnishes are mostly also called white varnish or white Japan as well, which can be rather confusing. Certainly compared to modern times where a white varnish or lacquer usually means a white pigmented or opaque coating. One needs to look at the context of ‘white varnish’ to determine whether it is transparent or if it has pigment.
Yesterday we were applying the first three pigmented layers. Today the panels have to be sanded smooth. In this case we’re dealing with a highly toxic pigment so we made some precautions. Chemically lead white is basic lead carbonate (2PbCO3 – Pb(OH)2) so to inhale this dust would be dangerous, but also although to a smaller degree absorption through the skin is possible. First the panels were taped on backside and sides of the panel so no possible lead dust would be left on the panel after sanding. The sanding procedure was carried out using a plastic bag in which the panel was sanded leaving the toxic dust inside the bag. After the procedure was completed the tape was taken off and was left in the plastic bag. After this the bag was sealed leaving all the toxic dust inside the bag. This whole process like all the other sanding procedures was carried out outside the lab wearing a respirator and disposable gloves.

Sanding the lead white layer
The following step was to prepare the wheat starch mixing with water then heating until thick and translucent. After the starch was prepared and strained it was warmed like body heat. The starch had to be applied in three separate layers allowing it to dry thoroughly between each layer.

Preparing wheat starch
Preparing white lacquer (Robert Dossie)
This specific varnish is needed for several recipes of light coloured varnishes. We will use this varnish to reconstruct the yellow, the green, the blue and the white coloured varnish. For preparing this varnish the following components are needed:
Mastic
Turpentine
The weighted mastic was first ground to a fine powder before it was added to the liquid turpentine. The mixture was heated in a double boiler until the mastic is dissolved. After this the solution has to be strained. Probably because the mastic is a really soft resin and will on its own not cause a high gloss surface, R. Dossie suggests to add to this solution gum animi (Hymenaea courbaril) which has to be ground with turpentine. In this case he’s talking about turpentine in a solid form so we’ve been using rosin (colophony) for this purpose. In historical literature there is sometimes spoken (like in this case) about turpentine in a solid form, however this is commercially not available anymore. In the Doerner Institute they did some experiments to produce this solid resin. For more information I would like to refer to their publication: Walch. Katharina, Koller. Johann. Baroque and Rococo lacquers. Bayerisches Landesamt für Denkmalpflege, München 1997.
After the components were ground together they were added to the mastic varnish to dissolve them. The gum animi did not dissolve very well in this solution, leaving some resin at the bottom of the jar. Finally the varnish was strained before use.

Ground mastic resin

R. Dossie’s white varnish
Preparing Shellac varnish (Robert Dossie)
This varnish is needed to compose the blue, yellow, orange and purple coloured varnishes from R. Dossie. To prepare this varnish only two components are needed:
Shellac
Alcohol.
The shellac has to be weighed and afterwards it has to be added to the alcohol. This composition has to stand on a warm place for two days to dissolve, like the recipe says: “place the bottle in a gentle heat where it must continue two or three days”
Like all the other varnishes we made needs it also to be shaken once in a while to prevent the shellac from caking at the bottom.
Preparing seedlac varnish (Robert Dossie)
This varnish was needed to compose the green, blue and white coloured varnishes of R. Dossie. The following agents where needed to make this varnish:
Seedlac
Gum animi (Congo copal)
Alcohol
First all the lightest and clearest pieces of the seedlac have to be picked out analogous as with the seedlac of Stalker and Parker described earlier. After this the gum animi has to be weighted and grinded into fine powder. Because availability of the Hymenaea courbaril we used in this case Congo copal although we have big questions if it will dissolve in alcohol? The seedlac together with the gum animi will likely make an exceptionally hard varnish with a high gloss but due to its brittleness it may cause cracks in the varnish. R. Dossie offers the possibility to add to this mixture a little bit of turpentine to take off the brittleness and mix it with the animi. After the components have been dissolved the varnish has to be strained.