Marianne’s Comments.
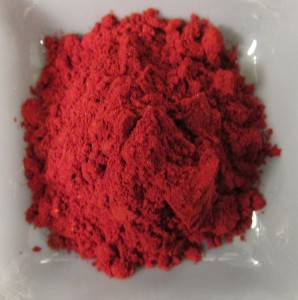
Yesterday Jonas added dragon’s blood to two of the varnishes we are preparing. Dragon’s blood conjures up images of alchemists in medieval castles preparing various magical potions. In fact, the name in one form or another has been used since ancient times to refer to a blood red resin. In Roman times it likely came from drops formed by the natural exudation of Dracaena cinnabari found on the isle of Socotra. By the 15th century the resin was being collected from the stems of Dracaena draco in the Canary Islands. It is not clear when they started to use the resin harvested from the exterior sheath on the fruit of Daemonorops draco, a rattan palm growing in Borneo, Sumatra and Malaysia. According to Kremer pigment, where my resin was purchased, this is the source to the dragon’s blood we are using. I do not think it will make much difference to the behaviour of the varnish since either of these sources may have been used historically. For further information on this resin and many others I highly recommend Jean Langenheim’s book on Plants resins. It s essential reading for anyone studying artist materials derived from plants.
Plant Resins -Chemistry, Evolution, Ecology and Ethnobotany by Jean Langenheim, 2003, Timberpress, Portland Oregon
Reconstructing black lacquer (Stalker and Parker) continuation
The boards now have six layers, so they were sanded smooth. In this part of the process another six layers had to be applied. As we explained, there are two different groups of panels, the one with the Venice turpentine mixed with the seedlac, the other one with the pure seedlac. It is interesting why they would choose to use these softer layers between the seedlac layers. Because it is softer it has more elastic properties. For example because of this elasticity it should be more capable of responding to shrinkage and swelling of the wooden substrate. Another reason could be that it is used to reduce the tension between several layers using the Venetian turpentine. Judging by this hypothesis the Venetian turpentine layers are used between layers of thick saturated black lacquer and a lacquer that contains about half of the amount of pigment used as in the first layers. In this case the Venetian turpentine layers could act as a buffer between these different kinds of lacquer. Still if this was the reason they used these softer layers why did they use six of them.
Well, returning to the physical lacquering of our panels the two groups show several differences both in the way of application and visible appearance. The pure seedlac flows a lot better and covers the piece quit well, leaving no visible brushstrokes. The seedlac containing Venetian turpentine is the other way around it flows less well than the pure seedlac, leaving a rather mat surface and visible brushstrokes. For the future it will be interesting to see if there is any difference in the way they degrade.
Reconstruction of red lacquer (Stalker and Parker) continuation
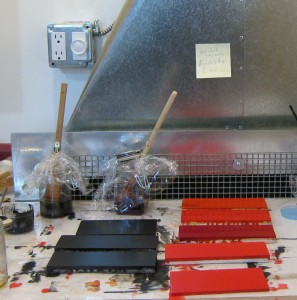
Yesterday all three of the sample boards were sanded smooth. Having this done the application of the following layers could be started. For the common usual red panel and the light pale red panel this procedure is the same. These panels were covered with eight layers of pure seedlac, after this the panels had to dry for at least 12 hours. Concerning the deep dark red panel, pure seedlac was be prepared before mixing with dragon’s blood. Bit by bit it had to be added to the seedlac till a nice blood red colour was reached. This mixture of the well dissolved dragon’s blood and seedlac was applied to the panel until it till it was well covered with it. In total we used 5 layers of this red lacquer. In comparison the recipe tells the following: “When you have laid the common red as before directed take Dragonsblood reduce it to very small dust or powder and as your judgement and fancy are inclined, mix it a little at a time with your varnish; and indeed you will find, that a very small portion will extremely heighten colour, as also that every wash will render it deeper, but when you find it has acquired a colour almost as deep as you design, forbear you must remember you have more varnish of seedlac to lay on which will add and supply what is wanting. Consider therefore how many washes are still to be laid, and according to that use your Sanguis Draconis or Dragonsblood.” Considering this explanation we made the dragonsblood mixture some bit lighter as what we had actually in mind considering the following seedlac layers.
Preparing Yellow lacquer (William Salmon) continuation
Four days ago we soaked the precious genuine saffron in the alcohol. Today the time has come to strain the saffron and to add the other components to it to make the actual varnish. We have some questions about this varnish; first when we look at the title it should be a yellow coloured varnish what we are preparing, but judging by the components used it would be a much darker and rather red colour. The colour of the saffron has an orange red colour with a yellow tint, the dragon’s blood is red, and the aloe has a brownish colour with also a yellow tint. On the other hand is the amount of resin in the mixture is minimal. Dragon’s blood is a red coloured resin, the Saffron is a dye and the aloe is a thickened juice of the leaves of different types of the Lilacaceae group and could act as a resin. Still the amount of resin is very low and we are really curious if it is capable on forming a film on our sample board. Also William Salmon gives no instructions how the layers should be built up, he only explains how to make this varnish. We expect this varnish to be applied as an upper layer, on the other hand it should not be a high gloss lacquer because it contains no hard resin. For now the varnish will be heated for a week. Next we will be doing several experiments with this varnish on different grounds to find out how this varnish should or could be used.
Preparing red varnish (William salmon) continuation
In the same context as the yellow varnish described above William Salmon gives also for this varnish no explanation on which ground it should be used. Although the varnish itself has to be heated till next week we are already preparing some experiments to do with it find out. One of these experiments is to test it on a common usual red ground (Stalker and Parker) so we have been preparing a sample board with the seedlac/vermilion mixture as described before. We used only the pigmented layers for this experiment.


