Marianne’s comments
Not too much to post today as we were pretty busy making varnishes.
I received a note about my way of putting horsetail in a bundle to use it like a glass bristle brush. It was felt that it would scratch the surface used this way. I have to agree that it indeed does scratch the surface, so obviously could not be used for fine finishing.
Albrecht Czernin answered my request for information by suggesting. ‘‘One way to use it, is take an internodium and fill it with water, let it soak a short while to get it flexible again. Then you can flatten it, let it dry and use it. It does not lose its sharpness easily and lasts a long time. Under magnification you will see why it works. Its surface is like a fine file.”
I am lucky that I have lots horsetail year round to so can prepare it fresh avoiding the need to soak it. My usual method of using it is to cut off the nodes, slit the tube so it can be opened up. The pieces are clamped between two boards and left for several days to dry. Then I choose the smoothest pieces and glue them to a small block of wood. This makes a great reusable sanding block. The debris from sanding varnish does not clog so a block last indefinitely.
Albrecht also suggested “As a bundle it is used along the length side of the bundle and just held together by the hand. With this method, the stems have to be kept round. The nodes can scratch a little bit, but usually they are of a smaller circumference. “ For fine work again only internodes have to be used.”
I have never used it this way but look forward to trying it. Thanks for the advice.
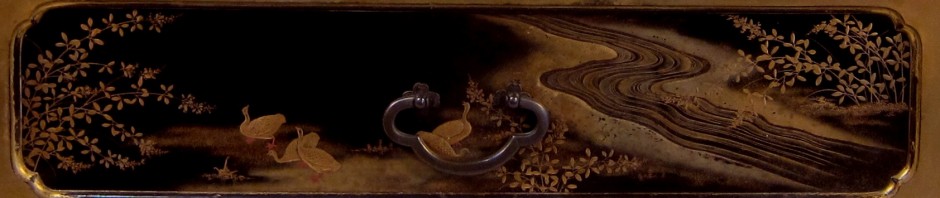
Here are a couple of photographs of the way horsetail was used in Japan. The black and white photo is the only one I happen to have of my sanding block method. Hopefully by the end of this blog we will have a new block to photograph.

Horsetail mat in Japan - used for abrading wood

Horsetail braided to form pad - Japan

Horsetail dried and glued to a block
Jonas’s Post Day 4
Reconstructing black lacquer (Stalker and Parker) continuation
Today after laying the first six layers of black varnish the sanding procedure had to be carried out. Each sample board was sanded with a p600 grit sandpaper. All irregularities had to be sanded out as well as possible brushstrokes.
Reconstructing red lacquer (Stalker and Parker) continuation
After the first four layers of red varnish had been laid on, the sample board has to be sanded off smooth, like the recipe says “…and if your reds are full, and in good body to your liking, rush it very smooth” Due to the toxic pigment used HgS (mercury sulphide) we applied two additional layers of transparent seedlac so no mercury dust is created during sanding. For the following day the sanding procedure will be the same for both the black and red panels.
Reconstructing white lacquer (Stalker and Parker) continuation
For the white coloured lacquer first the isinglass size had to be prepared as described before. After it had been strained and warmed up again the lead white pigment had to be mixed with it. In the beginning the mixing of the lead white with the Isinglass size did work very well. The viscosity of the Isinglass was too high by which a good dispersion between the two components was not possible. For this reason the lead white pigment caked to each other making clumps in the varnish. It was obvious that the viscosity of the Isinglass had to be lowered to allow dispersion to conform to our wishes. Perhaps we had not heated the isinglass long enough when we made it. (we warmed it approximately 30 minutes). We made a new batch, heating the size for two hours during preparation. The result worked out positively, the viscosity of the Isinglass was lowered and the lead white pigment could be mixed easily with it. Three layers of this mixture were applied.